Last updated 17/02/2021.
Raise an invoice
Jump to view raised invoices.
To raise an invoice for a customer you can either:
- Select the desired customer on the customers page or by using the search box at the top of every page then click the raise invoice option in the financial section of the left panel.
- Select the ‘raise invoice’ option from the ‘invoicing’ section of the main menu, then select the desired customer by name or ID.
- Select the ‘browse unbilled’ option from the ‘invoicing’ section of the main menu. This will allow you to to cycle through all customers with unbilled items alphabetically by customer ID.
The invoicing page
At the top of the invoicing page is the customer information panel.

This shows information about the currently selected customer. Click the arrow buttons either side of the customer ID to change to the next or previous customer alphabetically by ID. Only customers with visits or stock yet to be invoiced will be shown.
To select a specific customer click the ‘Select by ID or name’ link. To go to the customer page with this customer selected click the customer name.
The invoice number
The current invoice number is shown below the customer information. For the first invoice this number will default to 1. You may need to set the first invoice number to be in line with your previous invoicing system. To do so click the ‘change’ link next to the invoice number and enter the next invoice number to use. You cannot use a number that has already been invoiced. Each time Groundleader produces an invoice it will find the current highest invoice number and add one to it. After the initial invoice it should never need to be set again.
The invoice table
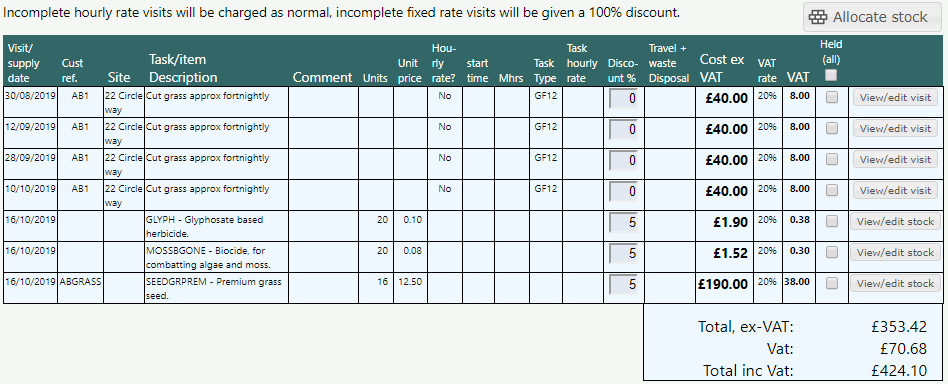
All visits that have been logged and allocated stock that have not yet been invoiced will be shown in the invoice table.

There are two items you can adjust for each invoice line. Please be aware that any adjustments made to the discount or invoice held settings made on this page will be lost if you navigate away from the page without raising the invoice. To make any changes permanent the visit or stock item would need to be edited.
- Discount percentage, this will initially show whatever value was set when the visit was logged or the stock allocated. You can change the value here if you wish to set a discount for this invoice line.
- Invoice hold, check this box if you don’t want to include this item on the current invoice. If a visit was marked as ‘invoice hold’ when it was logged it will initially show as held when the invoice is loaded.
Edit visits or stock
If you need to edit a visit or stock record click the ‘View/edit’ button in the line of the desired item. This will open the visit or stock form as appropriate where the item can be edited or even deleted. Once you have confirmed your change to the item the invoice table will reload to reflect the changes. See the visits or stock pages for more information on how to edit a record.
Allocate stock
It is possible to allocate stock direct to the invoice by clicking the allocate stock button to the top left of the invoice table. This will bring up the allocate stock form where you can choose which stock to allocate. Confirming the stock form will update the invoice table with the new items.
Allocate non stock item/visit
It is possible to allocate non stock items/visits direct to the invoice by clicking the non stock item/visit button to the top left of the invoice table. See the non stock item/visit resources page for more information on this feature.
Preview invoice
Before producing the invoice for real it is a good idea to preview it by clicking the ‘Preview’ Button. This will either open the invoice as a PDF in a new tab or download it direct to your computer depending on your browser settings. Check that you are happy with the format before invoicing it for real.
Raise the invoice
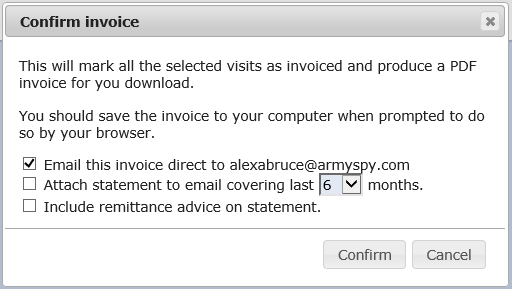
When you are absolutely sure that you are happy with the invoice contents click the ‘Raise invoice’ button. You will be asked to confirm that you want to raise the invoice.

If the customer has a billing email address set there will be an option on the confirm screen to send an email to the customer with a copy of the invoice as an attachment. This will be selected as default.
If you select to email the invoice to the customer there will also be an option to attach a copy of their current statement to the email, select if you want the statement to include a remittance advice or not.
Once confirmed the PDF invoice will be downloaded to your computer. You should store this in a safe place, if you did not opt to email the invoice to the customer you should send or email them your copy.
View existing invoices
To view all your raised invoices select the ‘View raised invoices’ option from the ‘invoicing’ section of the main menu. There are multiple filters that can be used to help you find any already raised invoices. Click the ‘Search’ button to apply your filters or ‘Show all’ to list all raised invoices.
For each raised invoice you can choose to view it or void it.
View a raised invoice
Clicking the ‘View’ button for an invoice will download a copy of the invoice to your computer. This can be handy if you misplaced the original copy.
Void an invoice
In Groundleader invoices cannot be deleted but they can be made void. To do so click the ‘Void’ button for the desired invoice. Voiding an invoice will cause all the included visits and stock to have their invoiced status removed, they will be included again in the next invoice. The invoice will no longer appear in any statements but will remain in your raised invoice list for future reference. The invoice number for a void invoice will not be reused.
Export invoices as spreadsheet
To download all your raised invoices in spreadsheet format select the ‘Export invoices – Excel’ option from the ‘invoicing’ section of the main menu.
This will download a spreadsheet to your computer. The spreadsheet will contain a row for each raised invoice with the following invoice information.
- Customer ID.
- Invoice date.
- Invoice number.
- Excluding tax value.
- Tax value
- Including tax value
