Last updated 16/02/2021.
What are sites?
Sites are the locations where your tasks are carried out. Groundleader stores sites separately from any customers actual address as a task will often not be carried out at their home address. It is possible to have multiple tasks at a single site. It is also possible to have tasks for more than one customer at the same site.
Adding a site
Select the ‘Manage Sites’ option from the ‘Sites’ section of the main menu to get to the sites page.
Click the ‘Add new site’ button on this page to add a new site or, when adding a task, use the ‘Add new site’ link on the task form.
Each site is made up of 5 location levels:
- County/City
- Town/District
- Neighbourhood
- Street
- Site ID
These locations are used for setting the order of the sites and to allow you to filter tasks by location. You can set up the 5 locations for each site however best works for your company, they do not need to be the exact postal address. It’s worth putting some thought into how you split up your sites geographically before adding any to avoid any problems later on.
Each location level needs to be filled in for every site. For some sites you may not need to use all 5 location levels, in this case you should make street the same as neighbourhood, for example:
Shetland, North Isles, Fetlar, Fetlar, The old manse.

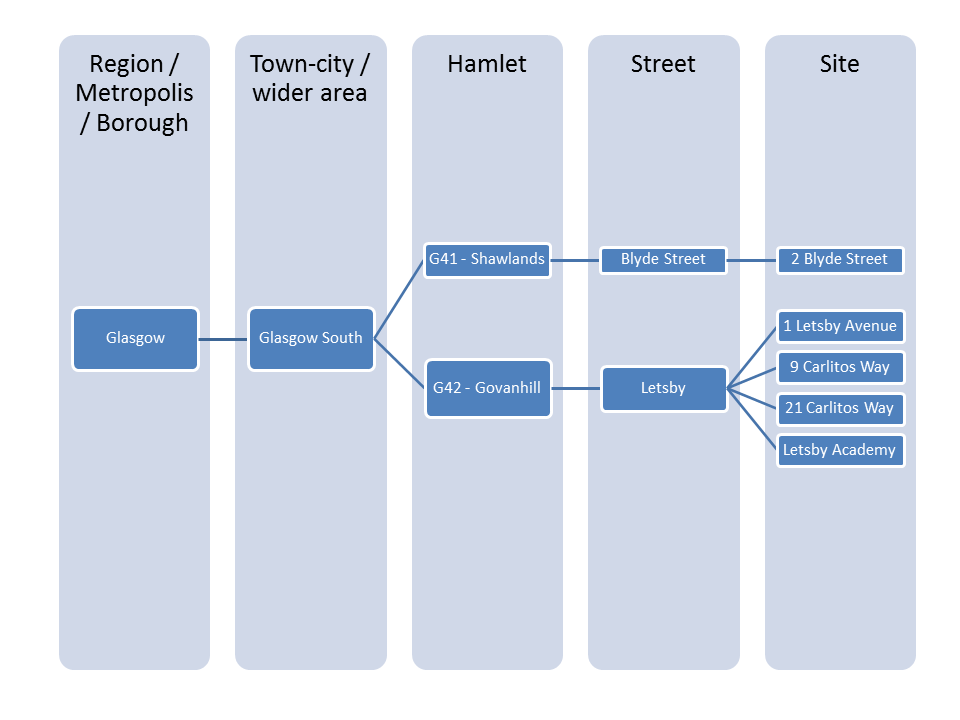
The above image shows how sites are stored under the hood by Groundleader. Each blue rectangle represents a location and each location in the last column represents a site. Each location has one or more ‘child’ locations and one ‘parent’ location. The exceptions to this rule are the top level location (County/City) which does not have a parent and the bottom level (Site) which does not have any children.
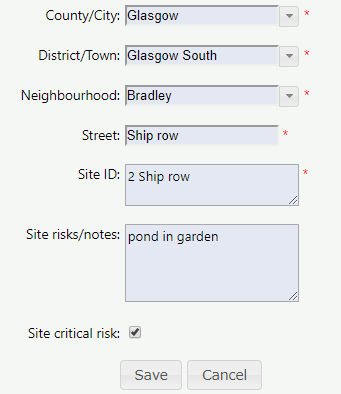
When adding your first site it’s just a simple matter of filling in the names of each location, the site ID and any site notes or risks, then clicking save.
Site risks
If a site has any dangers that your staff need to be made aware of enter them in the site risks box, they will be shown on any printed job sheets. If a site risk is deemed to be critical, check the “critical risk” checkbox, this will also be indicated on any printed job sheets.
Adding more sites
As you add more sites to Groundleader you can see any locations you have already added at each level by clicking the  button attached to each input.

Clicking the  button next to the top input will show a list containing all the top level locations (County/City) you have already added. If you wanted to add a new site in Glasgow you would select that from the list.

This will cause the list for the next level down to be populated with all “Town/District” that you currently have stored within Glasgow. If the site you wanted to add was in Glasgow South you would select that from the list.

If you need to enter a new location at any level just type in its name and click confirm. For example here we have not stored any sites in Glasgow Souths’ “Bradley” Neighbourhood yet so we type it into the appropriate textbox and click confirm.

As we didn’t already have the “Bradley” neighbourhood we wont have any streets within that neighbourhood. Now we can type in the rest of the site details and click save to store the site.
Site sequence
We have found that the most intuitive way to show tasks on the various lists within Groundleader and on the printed Job sheets is ordered by location. Whenever you add a new site you will be prompted to indicate where it fits within the rest of your sites.
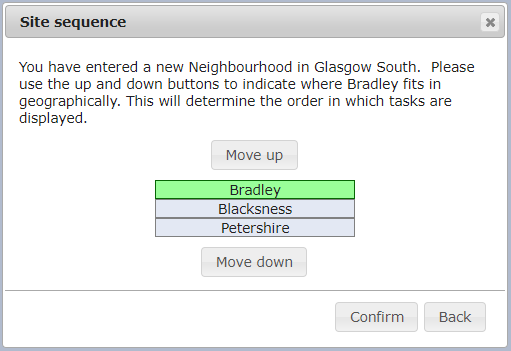
Using the example above where when adding a new site, Bradley was added as a new neighbourhood in Glasgow South.

Bradley is listed along with the other existing neighbourhoods of Glasgow South. You can set how you want these neighbourhoods to be ordered by clicking the move up or down buttons, doing this will move the selected location up or down in the list. Click save when you are happy with the order.
This concept works the same regardless what category the ‘new’ location is you are adding. It could be a new site in an existing street or a new town in an existing county. Ordering the locations at each level allows Groundleader to provide a geographically sorted list of all the sites you have stored.
Site Images
Images can be uploaded for your sites, each site can have multiple uploaded images. Site images can be useful to help your staff find them while out in the field. Site images can be viewed in the Groundleader mobile app for tasks that have been assigned using the daily job assigner. The app can also be used to add new site images.
To add or view images for a site select it from the list then click the ‘images’ button at the bottom of the site form. This will bring you to a page where all the existing images for the selected site can be viewed. To upload a new image from your computer click the ‘choose file’ button, navigate to the image on your computer, enter an image date and an optional title then click the ‘upload image’ button.
Users in the admin role may delete any images, users in the standard role can only delete any images that they uploaded.
Edit Sites
To edit a site you can enter its name in the search box at the top of the page. If you are not sure of the name you can also search by location or click the ‘show all’ button to list all you sites. Click on a site from the list to open it for editing. You can edit any details of an existing site including its location. Click save when you are done.
Edit locations
It is possible to edit your existing locations, you can change a locations name, change the order of a group of locations or even edit a locations ‘parent’ location. This can be done by clicking the ‘Manage locations’ button on the Sites page or on the main menu.
Here you have to drill down through the locations to find the site or location that you want to change.

In this example I’ve selected Glasgow again from the top location then Glasgow South as one of Glasgows’ Town/Districts. I now have the option to adjust the sub-locations of Glasgow or Glasgow South, this will open the same site sequence form I used to set the order of Glasgow Souths’ neighbourhoods earlier. We can also edit the name of a location by selecting the appropriate link. In the unlikely event that it turns out Bradley wasn’t in Glasgow South at all but somewhere else you can change it’s parent location by clicking the link and selecting the correct parent town.
Travel time
Another feature of sites in Groundleader is the ability to set a travel time. Travel times for a site can carry through to any visits that are logged at that site and allow you to easily determine a travel cost for any visit.
Travel times are not linked to each individual site but are instead linked to each neighbourhood, if you set a travel time for a neighbourhood it will apply to all sites in that neighbourhood. To set the travel time for a neighbourhood select “Travel time” from the main menu or “Set travel times” from the sites page. This page will list all the neighbourhoods you have stored, next to each one is a space for you to enter a travel time. The travel time should be entered in minutes, once entered it will show you what the travel cost will be. This is calculated from your current base rate. Click “save” at the bottom of the form to store any changes you make to the travel times on this page. To also update any tasks at the selected sites with the new travel time check that checkbox before clicking save.
How travel time affects task and visit pricing is explained in more detail in the tasks and visits resources pages.
