
Last updated 12/10/2022.
What is the job assigner?
The job assigner is a core part of the Groundleader application as this is where you will choose which tasks are to be carried out by your various teams on any given date. Once the tasks have been allocated there are a number of ways you can pass this information on to your staff. You can print a ‘job-sheet’ for each team which they fill in over the course of the day then return to you. Alternatively your staff can access the mobile Groundleader site on their phones to view and log visits for their assigned tasks. There is also a Groundleader app available for Apple and Android devices that can be used for logging assigned visits.
The job assigner can be used by users in the ‘admin’ and ‘standard’ roles.
Job assigners 1 and 2
Job assigner 1
is the original assigner. This page is better suited for people who assign their tasks day to day and don’t like to plan too far ahead. It makes it easier to fine tune any extra task details for the currently selected date such as task details and priority.
Job assigner 2
is better suited for people who are able to plan their visit dates further into the future, here you can see and set 28 days worth of assigned tasks at a time.
Job assigner 1
Team, date and region
When the page first opens you will be asked to choose which team and date you want to assign tasks for. You can select to assign for all teams or a single team at a time. If your staff assign their own work it is recommended that they choose their own team here. You can assign tasks up to one week in the future.
User in the administrator role can assign tasks to subcontractors, any available subcontractor teams will appear in the list with ‘(s)’ before their name.
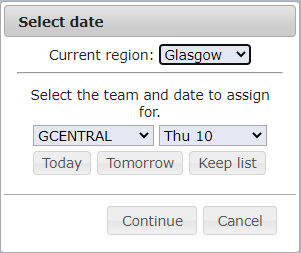
The ‘Today’ or ‘Tomorrow’ buttons are shortcuts which will load up the assigner for the desired day.
The ‘Keep’ button and drop-down menu option allows you to assign tasks to your ‘Keep’ list which is explained at the bottom of this page.
If you operate in more than one region you will also be prompted to select which region you wish to assign tasks in. Each regions tasks are assigned separately.
You can change the team, date and region you are assigning for at any time by clicking the ‘change’ link below where the currently selected date is displayed.
Page layout
The job assigner page is split into three sections:

The top section is where you filter the tasks you want to choose from.

The middle section contains the ‘Top table’ where your filtered tasks are listed. From here you select which tasks you want to assign for the selected date.
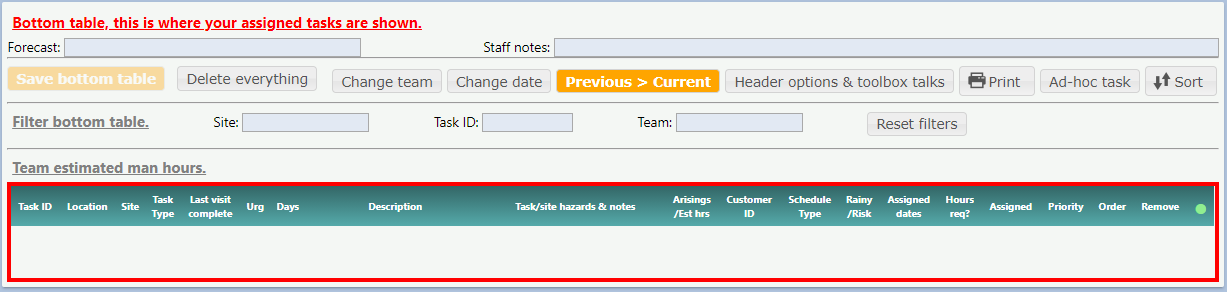
The bottom section contains the ‘Bottom table’, the list of tasks that you have currently assigned. These tasks will be included in the printouts you create for your various teams to work from. If you have selected to assign for a single team only the tasks assigned to that team will be shown in the bottom table.
Filtering tasks
In the top section there are multiple filters you can use to search for the desired tasks. Selecting an option from a filter and then clicking the  button below it will add those tasks to the top table. Clicking the
  button below filter will remove those tasks from the top table.
Advanced filter
At the top left of this section is the ‘Advanced filter’ button. Clicking this will open the advanced filter where you can better drill down to the tasks you want to add to the top list.
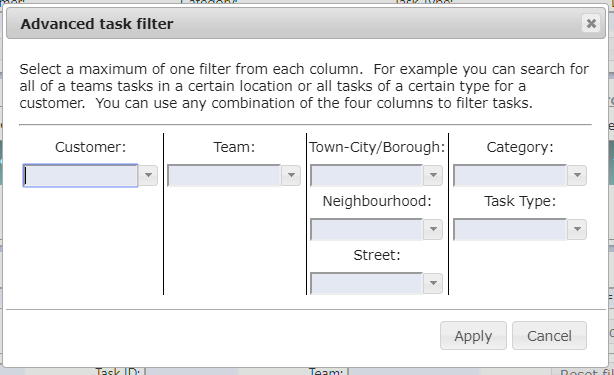
The advanced task filter.
Changing the team or date
The ‘bottom table’ will only show tasks assigned to the currently selected team and date. If you want to assign or view tasks assigned to another team or date or to your ‘keep’ list you should click the team name or date links at the top left of the page and choose the appropriate option.
Using the ‘Top table’
The top table holds any tasks that are returned by the filters used in the top part of the page. These tasks are not assigned to any team yet, you choose from this list which tasks you want to assign for the selected date.
Once you’ve filtered some tasks into the top table you can further filter them using the options above the table.
- Filter weather. This filters the task by its weather setting, rainy, dry or any. Useful for if it’s a rainy day and you only want to see tasks that can be done in the wet.
- Hide all over % complete. This lets you filter out all tasks that have a certain percentage of their required annual visits complete. It allows you to see tasks that may be lagging behind.
- Show all tasks with urgency over. This filters out all tasks under the selected urgency value. Urgency is explained below.
Task urgency.
Task urgency is a measure of how urgent the tasks next visit needs to be carried out.
- Less than 0 means the task is not yet due a visit. The days since the last visit is still less than the minimum days between visits specified for the task.
- An urgency of 0 indicates we are at the minimum days between visits value specified for the task.
- An urgency of 1 means that we are at the desired date for this task to be carried out.
- At urgency level 2 we are at the tasks maximum days between visits value.
- An urgency of over 2 means the task is overdue a visit.
Tasks should be carried out when the urgency is between 0 and 2, out with that they will be either to early or too late. An urgency of 1 is the tasks ideal visit date.
The task urgency is calculated for the date we are assigning tasks for, not the current date.
Tasks in the top table
The top table contains the tasks you have already filtered. There are some things you can edit for each task.
- Description. The task description is taken from the stored task, you can edit it here if you want to show something different on the printed job sheet. Any changes made here are not applied to the task.
- Team. Here you can choose which team you want to carry out this task. By default it will show the team that the task is currently assigned to but you can change it if you want. Clicking on the dropdown button next to this field will open a list with all your stored teams in it. You can choose one of those or enter a new team name.
- Priority. Select whether this task is high medium or low priority. High priority tasks are highlighted on the printed jobsheets, low priority tasks are shown slightly greyed out. Use this to show your staff which tasks need to be carried out on a given day and which are less critical.
- Order. By default the tasks in the ‘Bottom list’, when printed out, will be listed in geographical order. The order field gives you more control over the order in which the tasks will be listed. Enter a lower number to move a task to the top of the list or a higher number to move it to the bottom. The default value is 100.

An example of a task in the top table.
Other top table columns
Most of the column headings in the top table are self explanatory. The days value indicates how many days until Groundleader calculates the next visit is overdue, a minus value indicates how many days until it is due. The ‘assigned dates’ column lists all the dates on which the task is already assigned, this will be highlighted yellow if the task is already assigned to a date other than the currently selected date.
Assigning tasks
At the end of each row are three icons, the  icon will mark this task as assigned and add it to the ‘bottom table’. Tasks in the top table which have been assigned are highlighted green and the plus icon changes to a minus icon. To un-assign a task from the top table click the
  icon.
icon.
When a task in the top table has been assigned you can no longer edit the description, team, priority or order from its row in the top table. It can be edited in the bottom table if required.
To remove a task from the top table click the  icon. Removing an already assigned task from the top table in this way will not un-assign it from the bottom table.
The calendar icon  in the top table can be used if you want to assign the task to a different date than you are currently assigning for. Click the icon then choose the date and team you want to assign the task to and whether the start/finish times are required for this task. This can be useful if you see a task in the top list that you know you will need to do on a different day.
If you are assigning tasks for a single team you can still assign tasks to another team. This is done by entering the desired team name in the task row then clicking the assign button. Any tasks assigned to another team will only show briefly in the bottom table before being removed so that only your tasks are shown. If you are assigning for ‘all teams’ every task you assign will be shown in the bottom table.
More top list options
- The ‘Allocate all to’ option above the table can be used to allocate all the tasks currently loaded in the top table to a single team. Simply enter the desired team name then click the tick button. This only affects tasks currently loaded in the top table.
- ‘Wipe top list’ will remove all the tasks from the top list. This will not affect any assigned tasks in the bottom list.
- The ‘Assign all’ button will assign all the tasks currently loaded in the top list.
Using the bottom table
The bottom section of the page is where all your assigned tasks for the selected team (or ‘all teams’) and date are listed. These tasks will be included on any printed job-sheets and will be visible in the Groundleader mobile site and app for your staff. This is also where you set up the information that goes into the header of each printed Jobsheet.
Tasks in the bottom table
The row that represents each task in the bottom table is much the same as a row from the top table. There are a few extra fields though.
- Task/site hazards show any task or site hazards for the selected task, like the description this information can be edited.
- Arisings/Est hrs. This shows the arisings specification for this task and the estimated man-hours (if available).
- Hours req. This is where you indicate if the start finish times are required for this task. For hourly rate tasks this box will be checked as default. For fixed price tasks it’s up to you but it will load the default value you set for each task. Tasks that require the start finish times to be filled in will be denoted with an asterix (*) on the printed job sheet.

An assigned task in the bottom table.
To remove a task from the bottom table (un-assign it) click the icon. Clicking the icon is the same as in the top table, it lets you assign this task to another date. Here though you are given the option to copy the task to another date (will be assigned to the current date and the new date) or move it to another date (will only be assigned to the new date).
A note on un-assigning tasks
We want users in the standard and subcontractor roles to be able to assign their own tasks but we don’t want to allow them to un-assign any tasks that an admin user needs to be carried out.
Users in the ‘admin’ role can un-assign any tasks, users in the ‘standard’ role can only un-assign tasks that they assigned within the last hour. Subcontractor users can only un-assign tasks that they assigned with no time limit.
Task order
As tasks are added to the bottom table they will automatically be ordered by team and geographical location. If you edit any tasks in the bottom table to be a different team or order click the ‘sort’ button above the table to re-sort it.
Saving the assigned tasks
The bottom table will autosave every few seconds if changes have been made to it, at the end of each row is a small dot. A green dot indicates that the assigned task has been saved, an orange dot indicates that the task is yet to be saved. The ‘Save bottom table’ button will be enabled if there is any unsaved information in the bottom table. The autosave feature should run often enough that you don’t need to worry about your assigned tasks not being saved.
Bottom table options
There are a few options shown above the assigned tasks in the bottom table that can be used to manage your assigned tasks.
- Delete everything. this will remove all your assigned tasks for the selected date, use this with caution.
- Change team. This lets you re-allocate tasks from one team to another, simply select the team you want to assign from and the team you want to assign to then click confirm.
- Change date. This lets you move tasks assigned to the currently selected date to a new date, there is an option to move them all or just those assigned to a specific team.
- Previous > Current. This takes all tasks assigned to dates before the currently selected date and moves them to the currently selected date. You can choose to do this for all tasks or just those assigned to a specific team.
Ad-hoc tasks
If you want to add a task to the assigned list that you do not have set up as a proper task you can add an ad-hoc task by clicking this button. You will be prompted to enter an optional task location.
Once the task has been added to the list you can enter a task description and and hazard information. You should also remember to assign the ad-hoc task to a team. No visits need to be logged for ad-hoc tasks, they are just a good way to pass on any odd jobs that may need doing to your teams.
Forecast & Staff notes
There is a space at the top of the printed job-sheets for you to enter any weather forecast information for the day or any other notes you may want to pass on to your staff. Staff notes could be used to show who should be in each team or the general area each team is going to be working in. The same forecast and staff notes are shown for each team on any given day. Different forecasts and notes can be set for different days.
Header options & toolbox talks
Click on the ‘Header options’ button above the bottom table to view the header information.
Here you can make space at the top of each jobsheet for your staff to fill in their start, finish and break times for the day. Choose how many of these spaces to include on each form.
Checking the copy staff notes box will cause the staff notes to be copied over from one day to the next.
There is also space at the top of each printed sheet for you to optionally add one or two toolbox talks. Toolbox talks are created on the toolbox talks page and are sorted by category. You can choose to show any random toolbox talks each day or select specific ones to include for the currently selected date.
Filtering the bottom table
The bottom table can be filtered by site, task ID or team name. This can be handy if you can’t remember which team you assigned a specific task to or just want to see which tasks are assigned to a certain team.
The filters can be cleared by clicking the reset filters button.
Team estimated man hours
As you add tasks to the bottom table this section will keep track of the total estimated man-hours worth of tasks assigned to each team. If a task does not have an estimated man-hours set Groundleader will look through previous visits to get an average man-hours per visit value. If you see a (?x2) behind the man hours value this means that Groundleader was unable to get the estimated man-hours for two of that teams tasks.
This can be a handy feature to ensure you have assigned enough work for each team.
Printing the job-sheets
Click the print button to print out a pdf of all the assigned tasks. This will create a separate job sheet for each different team you have tasks assigned to. Each job sheet has space for the staff to fill in start, finish and break times for each task. There is also a space to enter information about any waste removed from the site.
You have the option to only print the job-sheet for a specific team or to print for all teams with assigned tasks on the selected date.
At the end of the day the completed job sheets should be returned to whoever is responsible for logging the visits. The visits can be quickly logged on the ‘Log team visits’ page.
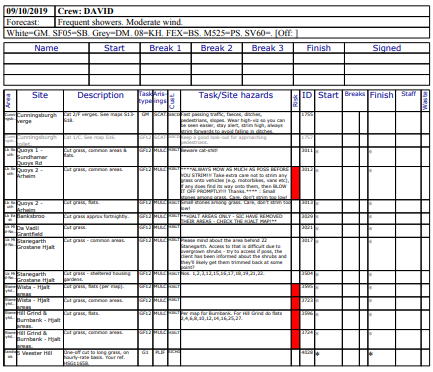
An example of a printed job sheet
Multiple users
It is possible for more than one user to be logged into Groundleader and assigning tasks at the same time.
If you and another user are updating assigned tasks for the same date at the same time, your bottom list will update to reflect any changes made by the other user. For example if the other user adds an assigned task that task will be automatically added to your bottom list. If the other user edits or removes an assigned task that change will also be mirrored on your list.
A message will appear at the bottom of your screen whenever the assigned tasks have been changed by another user.
The keep list
Task in the keep list are not assigned to any specific date and are not automatically removed from the assigner when a visit is logged. To assign tasks to your ‘Keep’ list click the ‘Keep’ button or drop-down option when selecting a date.
Normally when a visit is logged for an assigned task the default option is for that task to be removed from the assigner. This is not ideal for tasks that are carried out on a daily basis as they would need to be added back to the assigner each day.
The keep list is where you should assign tasks that are not carried out on a scheduled basis, such as rainy day tasks, or tasks that are carried out more often, perhaps every day. For example in the winter you could assign all your snow clearing tasks to a ‘Snow’ team in the keep list. This would allow you to produce a snow clearing work list every day without having to worry about having to reassign the same tasks again for the following day.
The keep list could also be used to store a prepared list of rainy day tasks assigned to a ‘Rainy’ team. On a rainy day you could easily print off the ‘Rainy’ teams job sheet from your keep list.
The ‘urgency’ and ‘days till due’ columns for tasks in the top and bottom tables will not show any information when working with the keep list as it is not set to any specific date.
The ‘previous > current’ option is not available when working with tasks in the keep list as these tasks are not assigned to any specific date. The ‘Change date’ option will copy the selected tasks to the new date rather than move them, they will remain in the keep list.
subcontractors any available subcontractor teams will appear in the list with ” name=””>The only way to remove a task from the keep list is to click the icon next to it in the bottom table or if you select to remove it from the assigner when using the log team visits page.
You can print job sheets directly from the ‘keep’ list or copy the tasks stored here to a certain date using the calendar icon next to each task or using the ‘change date’ option above the bottom table.
Job assigner 2
Job assigner 2 relies on all tasks already being set to the team or subcontractor that usually carries them out. This is done on the tasks or task datasheet view pages. Assigner 2 shows all of each teams tasks on the page at once and assigned visit dates can easily be set by clicking in the relevant date. This makes it useful for planning days, weeks or even a whole season ahead.
Job assigner 2 is designed to be simpler to use and does not have as many features as job assigner 1. We plan to add more features to this assigner and would appreciate feedback from our customers as to what features would be desirable here, please contact us at admin@groundleader.com with your ideas.
Filtering tasks
If there is more than one region set up the region filter will filter the teams shown on the page by the region they are set to. The weather filter will filter the tasks by their weather setting eg. dry, rainy or all. Out of season and inactive tasks are filtered out by default but can be shown by selecting the relevant checkbox.
Manage assigned
The ‘Prev > Current’ button works the same as in assigner 1. It gives the option to take all tasks assigned to the selected team (or all teams) before the selected date and move them to the selected date.
Team & task list
All the teams and subcontractors that are currently set up in Groundleader are listed down the left side of the page, the team name is followed by the number of tasks linked to this team and the number that are assigned. Each teams list of tasks is initially collapsed, clicking the arrow button to the left of the team name will toggle the teams list of tasks open and closed. Any tasks not set to a team, those whose team is set to ‘n/a’ in the task details form will not be shown on assigner 2.
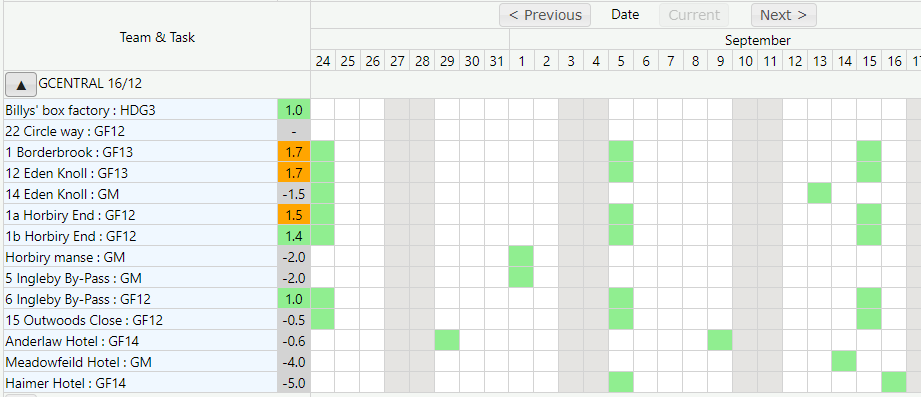
Team GCENTRALS expanded task list
Expanding a teams task list will show all the tasks linked to that team, the site name and task type will be shown. Each tasks urgency value will be shown as it is on the current date. The urgency is calculated as -5 when it has just been carried out to 0 at the tasks minimum days between value, 1 at the target value and 2 at its maximum days between value. any value over 2 indicates the task is currently overdue a visit.
A calendar for the next 28 days will be shown to the right of the task list, green or blue highlighted cells indicate dates on which each task has an assigned visit. The ‘previous’ and ‘next’ buttons above the calendar can be used to view dates in the past of further into the future, the ‘current’ button will return the page to the current date.
Any days on which the selected team do not work will be shown grey in the calendar. See the team help page for details on how to set a teams work days.
Assigning tasks
A task can be assigned to any date by simply clicking on the relevant calendar cell. This will assign the task to it’s team with a default order value of 100 and medium urgency.
Clicking on the green or blue calendar date for an already assigned task brings up a form where it’s details can be adjusted or the assigned record deleted.
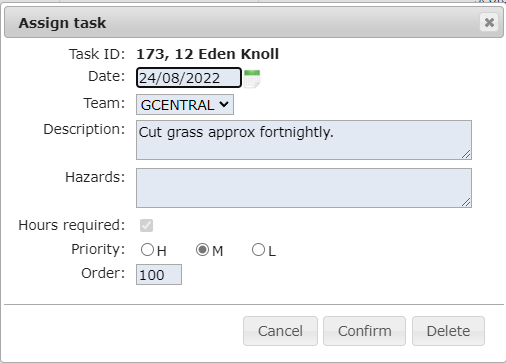
The form to fine tune or delete an assigned task.
The assigned task can be moved to another date or team and the description or hazards changed. The hours required checkbox will be ticked by default for hourly rate tasks and any tasks set to require man hours. When logging the visit via the Groundleader mobile app or the Groundleader website the start and finish times will be required if this option is checked. Tasks with a high or low priority will be highlighted as such in the Groundleader app and printed job sheets. The order value decides the order assigned tasks are shown in the app and printed jobsheets, lower numbers appear closer to the top. Where tasks have the same order number they are ordered by there geographical location as set in the tasks site.
Changing team
Assigner 2 works best if the tasks are mostly carried out by the teams they are set to on the task form. It is still possible to assign a task to a different team by clicking on an assigned date and changing the team.
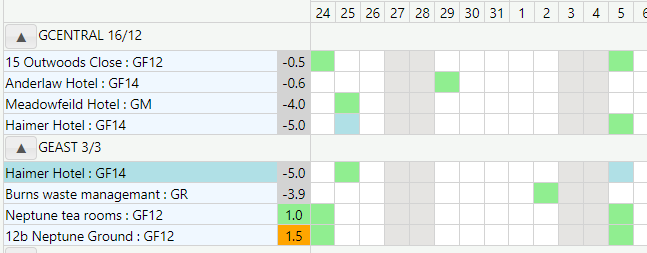
The first Haimer hotel visit has been changed to the GEAST team.
In the example above the Haimer hotel task is set to the GCENTRAL team so appears in their list but its first assigned date has been edited and changed to the GEAST team so it now appears in both teams lists. As the task does not belong to the GEAST team it is highlighted here in a darker blue. Looking at the actual assigned visit dates the first date for this task appears blue in the GCENTRAL team list to show it is assigned to a different team, the task remains in their list as it belongs to them. The subsequent visit dates remain green as they are still assigned to the GCENTRAL team. An assigned date that appears blue denotes that that particular visit date is assigned to a different team that the one whose list it is shown in.
Auto assigning tasks
Where a team has its ‘auto assign tasks’ setting turned on – see the teams help page for details on how to do this – assigning a visit date will cause all subsequent assigned dates to be set automatically. The page will update to show the automatically added visit dates when this happens. The tasks future visit dates will be also automatically updated when a visit is logged, an assigned date is edited or deleted and if the task is edited to have a different days between visits value.
Fixed schedule visits
If a tasks schedule type is set to ‘fixed’ then any fixed visit dates set for that task will automatically be added to the job assigner. See the fixed schedule visits help page for more information on setting up fixed schedule visits.
Alternative visit logging methods.
The recommended method for staff to see and log visits that have been assigned to them is to use the Groundleader mobile application available for both Android and Apple devices. See the Groundleader app help page for more information on getting and using the app.
Groundleader also has a mobile version of the website where users can log in and view all the tasks allocated to them. Your staff can use this site on their mobile phones to log their own visits as they complete them, See the mobile site help page for more information on using it.