Last updated 09/12/2021.
There are two ways to log visits within Groundleader, you can log a single visit using the full visit form or log multiple visits at a time using the log team visits page. Visits can also be logged using the mobile site and with the Groundleader mobile app. Only visits logged using the main website are covered by this document.
Page index
Log a single visit.
The full visit form.
Log team visits.
View and edit visits.
Edit team visits.
Non conforming visits.
Invoice held visits.
Logging a single visit
To log a single visit you can select the ‘Log single visit’ option from the main menu under the ‘Visits & stock’ heading. You can also choose to log a visit from the tasks page by selecting a single task and clicking the ‘Log visit’ button.
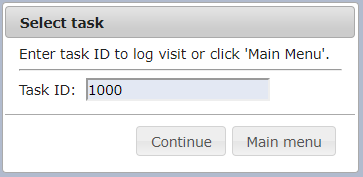
When you choose the ‘Log single visit’ option from the main menu you will need to enter the ID of the task you want to log a visit for.
Full visit page layout
The full visit form is split into a few sections,
- The top section contains links to the customer page and the task page for this visits customer and task.
- The next section down contains the form where you will enter information relevant to the visit.
- To the right is a schedule information section, this will contain information relevant to the tasks schedule type such as date of last visit and days since last visit.
- The pricing section is only shown to administrator users. No pricing information about visits is shown to non administrator users.
The full visit form
The task ID, task description and site name are shown at the top of the form. The rest of the fields are explained below.
Season start year
This is filled out with the current seasons start year for this task. The only time you’d want to change this is if you want to log a visit for a previous season. Seasons are explained in greater detail on the seasons resources page.
Visit date
Enter the date the visit was carried out here, the date format required is shown in the textbox.
Allocated team
Choose from the dropdown the ID of the team that carried out the visit, you can choose to add a new team if required using the link provided.
Team members
Here you enter the team members who carried out the visit. If you have set up your teams to have default team members those staff will be loaded when the team is selected.

To remove a team member click the x next to their name. To add a team member click in the textbox and start typing their Groundleader user name then select the correct team member from the list. You can only add staff to visits who have been set up on the staff page within Groundleader.
You can make the staff selected into the new default staff for the selected team by checking the ‘Make this the new default team members’ checkbox.
Start, finish & breaks
Start and finish times are always required for hourly rate tasks, for fixed price tasks they are optional. It can be useful to enter them for fixed price tasks as then the profit analysis page can be used to analyse if you are charging the correct amount.
Times should be entered in 24 hour format eg. 1415. Also enter any breaks taken by entering how long the break was in minutes and how many staff were on the break. For hourly rate tasks the total break time will not be charged for.
Travel time
If you have a travel time set for this task it will be loaded as default. Travel time is only charged for hourly rate visits, it is charged at the same rate as the task and does not take into account the number of staff. The travel time should be entered in minutes.
Disposal cost
Disposal cost is where you can charge for any waste that needs to be removed from the site. Enter it as a monetary value but without any currency symbol for example 17.45. It is only charged for hourly rate visits. It can be entered for fixed price visits for your information but will not be charged to the customer.
Weather
You can optionally select the weather conditions that were prevalent during the visit. You can set values for ground conditions, precipitation and wind. Groundleader will have set you up with some default values to choose from, you can set up your own weather categories by using the link on the visit form or going to the main menu and selecting ‘Global settings’ > ‘Other settings’ then weather.
If the task hourly rate and set to have it’s price affected by the weather (see tasks page for more information) then setting the weather may reduce the calculated price of the task. Each weather option has a % value that you can use to reduce the hourly rate by.
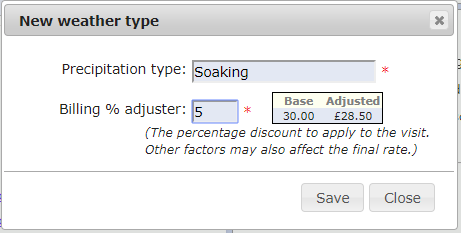
Adding a new precipitation option with a discount set.
An example of where this could be used is cutting grass on a very rainy day may take much longer or leave a lower quality finish than on a dry day. Setting a small % discount for the rainy weather would give a bit of a discount for this visit. Whether you use this feature or not and what you set the percentages to is entirely up to yourself. The default weather settings do not create any discount.
Allocate stock
This will open a panel where you can allocate stock items to this visit. Stock is explained in greater detail on the Stock resources page. Click ‘confirm sale’ to confirm your selection or ‘cancel’ to go back to the visit form.
Visit complete
Make sure this box is checked if the visit was completed. Fixed price visits will not be charged for if they were not completed. Hourly rate visits will be charged regardless of if complete or not.
Invoice hold
This option is only shown if the form is being used by an administrator user. Check this box if you don’t want to add this visit to an invoice just yet. Invoicing is explained in greater detail on the Invoicing resources page.
Notes & hidden notes
Optionally enter any notes relevant to the visit, notes will be shown on the invoice line for this visit. Hidden notes will not be shown on the invoice.
Pricing details
The pricing details panel is only visible to administrator users. What this panel shows will depend if the visit is fixed price or hourly rate.
Fixed price
For fixed price visits the pricing panel will show the tasks current fixed price, click the ‘change’ link to enter a different fixed price for this visit.
You can also select to apply a percentage discount to this visit.
Hourly rate
For hourly rate tasks the pricing section will update as you fill in the start and finish times. It shows the following information.
- Total Hours:min will display the total time this visit has taken when the start and finish times have been entered.
- Base rate displays your current hourly base rate.
- Task type rate adjuster will show any percentage that the task type adjusts up your base rate by. You can edit this value for each visit if desired.
- Adjusted rate shows what the hourly rate is for this visit (the base rate adjusted up by any task type adjuster).
- Cost for man hours displays the basic man hours part of the total cost.
- Weather discount shows any percentage discount caused by the selected weather type, this value can be edited.
- Discount will show any customer discount that you have set for this specific customer, this value can be edited.
- Travel cost will be any travel time you have entered for the visit charged at the adjusted rate.
- Disposal cost will be the disposal cost you entered on the visit form.
The total cost for the visit and any allocated stock will be shown at the bottom of the section. If you are registered for tax the tax amount will also be shown.
Change pricing type
Groundleader is flexible enough that you can change the pricing type of a visit from fixed to hourly or vice versa. This is done by clicking the change button next to the displayed pricing type. This will not change the pricing type of the task itself, just this visit.
Historical pricing
Groundleader keeps track of each time you change your base rate and each time a tasks pricing is changed. When entering the visit date Groundleader will fetch the appropriate pricing information for the selected date.
Log team visits
This is the quickest way to log multiple visits at a time. You need to have already produced printed job lists for your teams using the job assigner page in order to make use of this page. At the end of each working day each team should return its completed job sheet that was created by the job assigner. You can use this sheet to quickly log all of each teams visits for the day.
Use the  button at the top of every page or the ‘Log team visits’ button in the ‘visits & stock’ section of the main menu to get to the log team visits page.
Selecting a team
When the log team visits page first opens you will be prompted to choose which teams visits you wish to log. The team name is printed at the top of each job sheet. Once you have selected a team you will need to select the date that the tasks were assigned to and the date the visits were carried out. Be aware of the difference between these two dates, it it possible that the visits were not carried out on the day they were assigned to be carried out. The assigned date is also printed at the top of each sheet. If your company operates in more than one region you may also need to select the region the tasks were assigned to.
Invalid team
You may get a message saying you have selected an invalid team after confirming your team and date selection.
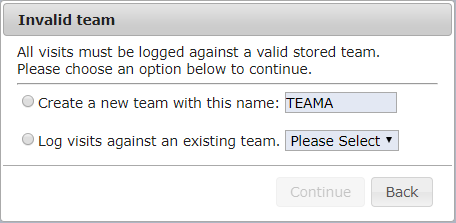
When you assign visits using the assigner you can enter anything you want as the team name. However, visits need to be logged against a team that you have saved in Groundleader on the teams page or the add task form. If the team name you have selected is not stored within Groundleader you have two options here.
- Create a new team with this name will store this team so the visits can be logged against it.
- Log visits against an existing team lets you choose a stored team for the visits.
Once you have confirmed your team and date the page will load with all the tasks you have previously assigned to that team on the selected date. At the top of the page is a link to log visits for another team or date.
Staff selection
The first thing you will need to do on this page is ensure that the correct staff have been loaded for the team. The staff are listed at the top left of the page.
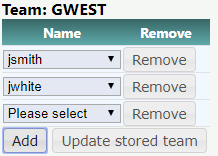
This list will fill by default with the staff you have set up for the selected team. You can add or remove team members using the buttons provided. You can also update the default members for the selected team. You will only be able to select staff that you have already set up on the staff page.
These staff will be logged as having carried out each visit in the list. It is possible to change the staff at each visit by clicking the number in the staff column.
Weather
At the top right of the page you can optionally set what the weather was like for the day. This weather selection will be applied to each visit in the list.
Enter visit details
Each task is displayed as a row on the page.

We’ve made this page really easy to navigate quickly between the most common inputs using the ‘tab’ key on your keyboard. Starting on the ‘carried out’ checkbox, clicking tab will move focus to the start time input, then the finish time input then down to the ‘carried out’ checkbox on the next row.
Carried out
Check this box for each task that was carried out by your staff, visits will only be logged for tasks that have this option checked. Checking this box will automatically check the ‘remove from assigner’ option.
Remove from assigner
This box should be checked if you want to remove this task from the assigner once the visits have been logged. If a task is carried out every day or has not been completed you may wish to uncheck this box.
Date
The date the visit was carried out, this will be fill by default with the date you chose when you loaded this teams tasks. It is possible to edit the date here if you need to.
Start finish & breaks
Enter any start and finish times for the task. Hourly rate tasks will need the start and finish times filled in, these are highlighted light pink with an *. Break times should be entered in minutes and the number of staff on break needs to be entered. If there were no breaks these fields can be left blank.
Flexi-batch group
This allows you to set individual start and finish times for multiple tasks that were carried out together. For example, your team split up and cut all the gardens on a street but only gave you start and finish times for the street and not each garden. For each task you want to include in the group select the same number from this dropdown. This feature only works for tasks that have an estimated man hours value set as Groundleader needs this to calculate a time for each visit.
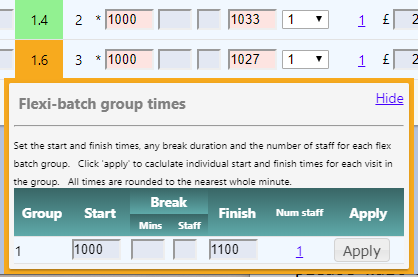
Here I have added two tasks to group one, in the flexi-batch popup that appears at the bottom of the screen I entered the total time for those two tasks, 1 hour, then clicked apply. These tasks have slightly different estimated man hours set so Groundleader has split the time proportionately between the visits.
As Groundleader does not know which visit was carried out first it gives all the visits in the group the same start time. You can have up to 4 flexi-batch groups on the form at a time.
Num staff
This displays the number of staff at each visit, the value will update if you add or remove staff in the top section of the page. It is possible to change which staff were at a visit by clicking on this number. This will bring up the full staff list where you can select the appropriate staff.
If you manually set the staff at a visit using this option the staff number will turn purple. This indicates that the staff selection for this visit is ‘locked’ and any further changes to the staff at the top of the page will not affect this visit.
Waste cost
Here you can enter the cost of any waste disposal for this visit. If you have a disposal cost set for the task it will be loaded here as default. There is a space on the printed jobsheet for your staff to indicate the amount of waste removed from each visit.
Notes & hidden notes
Optionally enter any notes relevant to each visit, notes will be shown on the invoice line for this visit. Hidden notes will not be shown on the invoice.
Spray
Clicking the spray icon will open the allocate stock dialog with the category set to herbicide/pesticide. Here you can allocate any stock used at this visit. Stock is explained in greater detail on the Stock resources page.
Full form
Clicking the full form button will open this visit in the full visit form. This can be useful if you need to set something that is not available in the log team visits form such as pricing. If the visit is saved using the full visit form it will still be shown on the log team visits page but you will no longer be able to make any changes to it.
Log the visits
When you have finished entering the data for the selected teams visits you should click the ‘Log visit’ button to log these visits. If you have indicated that all the visits on the list have been completed they will be saved and you will be prompted to select another team to log visits for.
Remaining visits
If not all of the tasks on the teams job sheet were completed you will be prompted what you want to do with the remaining visits.

- Carry over remaining tasks to another date or team. This will prompt you to select a team and date that you want to reassign the remaining tasks to.
- Remove remaining tasks. This will remove any remaining visits from the assigner.
- Make no changes. This will leave the remaining tasks assigned to the same team and date.
View and edit visits
To view a list of visits that have already been logged select the ‘Search visits’ option form the ‘Visits & Stock’ section of the main menu.
The visit list
The visit list page will load all visits logged in the last year as default. There are many filter options at the top of the page that will help you find any particular visit you are looking for, click ‘Apply filters’ to perform the visit search.
Check non admin logged visits
Users in the admin role will have the option the check any visits that have been logged by non-admin users. Check the ‘Not admin checked’ option and click apply filters to view any unchecked visits.
Each visit in the list will have a checkbox next to it, check the box for each visit you wish to mark as having been checked then click the ‘Confirm checked’ button to mark the selection as having been checked. Un-checked visits can still be invoiced as normal, this feature simply allows you to check over any visits that have been logged by your staff.
Check for duplicated visits
To check for visits that may have been mistakenly logged twice in the same day check the ‘Duplicates’ check box then ‘apply filters’.
Edit a single visit
To open a visit for editing selecting the desired visit from the list will open the full visit form for that visit. This form is explained in great detail further up this page. If the visit has been invoiced you will initailly not be able to edit the it. There will be a link at the top of the page ‘I really need to edit this visit’ that can be used if you need to make changes to it.
Edit team visits
This is a page where you can edit all the visits carried by a single team on a specified date. Handy if you accidentally logged a bunch of visits with the wrong date or staff. Navigate to this page by selecting the ‘Edit team visits’ option in the ‘Visits & Stock’ section of the main menu. When the page first opens you will be prompted to enter the team name and date for the visits you want to edit.
Once the list of visits have been loaded you can use this page just the same way as when entering information on the logging team visits page. You can edit the date, number of staff, start & finish times, disposal cost and notes. The only difference here is that you can edit the weather individually for each visit. You can also use the ‘Full form’ button to edit this visit using the full visit form.
Any visits with unsaved changes will be highlighted in orange. Click the ‘Save changes’ button to save your changes.
Non stock items/visits
It is possible to log one off visits without first having to add a task and site. See the non stock item/visit resources page for more information.
